Simplify Data Tracking with Google Tag Manager: A Step-by-Step Guide
In this detailed guide, we will explore how to effectively use Google Tag Manager (GTM) for setting up event tracking in Google Analytics 4 (GA4). Whether you’re a developer, marketer, or analyst, this article provides practical strategies to harness GA4’s event-tracking features.
Throughout this guide, we’ll cover essential best practices for developers utilizing the dataLayer, effective campaign tracking techniques for marketers, and valuable tips for analysts to optimize GA4 data analysis. Additionally, we’ll discuss customization options and cost-effective implementation approaches.
By the end of this article, you’ll have a solid understanding of implementing GA4 event tracking with GTM, regardless of your role or experience level.
What are Google Analytics and Google Tag Manager
Google Analytics 4 (GA4) is the latest version of Google’s web analytics platform. It provides insights into how users interact with your website or app, allowing you to track events, measure conversions, and understand user behavior.
Google Tag Manager (GTM) is a tag management system that allows you to easily deploy and manage various tracking and marketing tags on your website or app. Tags are snippets of code that send data to third-party tools, such as Google Analytics.
This article is intended for all GTM users, including developers, marketers, and analysts. Whether you’re new to GTM or have experience with it, you’ll find valuable information on how to effectively implement GA4 event tracking using GTM.
GTM provides a user-friendly interface to manage your tags without needing to directly edit your website’s code. You can use it to set up GA4 event tracking by configuring triggers that capture user interactions and tags that send the corresponding data to GA4.
Benefits of Google Analytics
Using GTM to implement GA4 tracking has several benefits:
- It separates the tracking configuration from your website/app codebase, making it easier to maintain and update.
- It allows marketers and analysts to manage tags without needing to involve developers for every change.
- It provides a centralized place to manage all your third-party tags, not just GA4.
Collect Data Using Google Tag Manager (GTM)
Before we explore the specifics of implementing event tracking with Google Tag Manager (GTM), let’s take a step back and understand what events are and why they are important. In the context of Google Analytics 4 (GA4), an event is an interaction or occurrence on your website or app that you want to measure and analyze. This could be a user clicking a button, submitting a form, watching a video, or making a purchase. By tracking these events, you gain valuable insights into how users engage with your site, which features are popular, and where there may be issues or opportunities for improvement.
GTM provides a user-friendly way to implement event tracking without having to modify your website’s code directly. It works by allowing you to define tags (snippets of tracking code) and triggers (conditions for when tags should fire). When a trigger condition is met, such as a user clicking a specific button, the corresponding tag fires and sends the event data to GA4.
A key concept in GTM event tracking is the dataLayer. This is a JavaScript object that holds the data you want to pass to GA4. By pushing event data into the dataLayer, GTM can then access that data and send it to GA4 via tags. In the following sections, we’ll dive into the specifics of how to implement event tracking using the dataLayer and GTM.
Tracking with Implementing “dataLayer” for Google Tag Manager
The dataLayer is a JavaScript array used in conjunction with Google Tag Manager (GTM) to pass information from your website to GTM. It acts as a global variable that can store and share data. The dataLayer allows you to send information about user interactions, events, or variables from your website to GTM without having to modify the source code every time.
Here’s a breakdown of its key aspects:
- Purpose: The primary purpose of
dataLayeris to hold and pass data from your website or web application to Google Tag Manager. This data can include things like user interactions (button clicks, form submissions), eCommerce transactions, or any custom data relevant to your tracking and analytics needs. - Implementation: The
dataLayeris typically initialized at the top of your web page within a<script>tag. For example:
<script>
  window.dataLayer = window.dataLayer || [];
</script>- Data Push: To send data to GTM, you can push objects (data) onto the
dataLayerarray. Each object should be formatted as key-value pairs, where the keys represent the names of the variables and the values are the data you want to send.
<script>
  window.dataLayer.push({
    'event': 'link_click',
    'href': 'https://insightmeasure.com/'
  });
</script>- In this example, when a button with the name “link_click” is clicked, an event named ‘link_click’ along with the button’s name is pushed to the
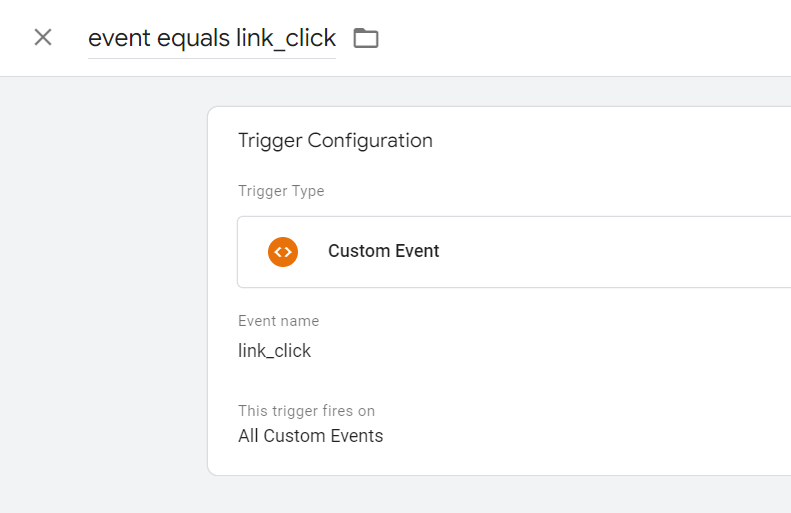
dataLayer. - Triggering Tags: In GTM, you can set up tags to fire based on the data pushed into the
dataLayer. For instance, you might have a tag that fires when theeventkey is ‘link_click’. This tag could be set to track this event in Google Analytics or any other supported service. - Variable Substitution: The
dataLayeralso allows for dynamic variable substitution. You can use data from thedataLayeras variables in GTM, making it powerful for custom tracking and analytics setups.
When one button, icon, or link is clicked, in the code, we push the data to the dataLayer:
In GTM, we use data layer variables and triggers to grab the data. Then, use a tag to fire the data accordingly. This is the best practice by separating concerns that developers manage where to implement the data layer and let GTM do the rest of the work.

Tracking with Custom HTML in Google Tag Manager (No dataLayer)
If you don’t have access to implement the dataLayer directly or sometimes we don’t have many resources to engage with developers. There are other alternatives. It looks easy to track a button, icon, or link with customization with custom HTML, but it’s not recommended as it introduces complexity. For example,
<script>
  var button = document.querySelector(".selector");
  var href = document.querySelector(".selector").href;
  button.addEventListener("click", function(event) {
    window.dataLayer.push({
      event: "link_click",
      href: href
    });
  });
</script>
To prevent the code from polluting the global scope, we’ll do the IIFE (Immediately Invoked Function Expression):
<script>
(function() {
  var button = document.querySelector(".selector");
  var href = document.querySelector(".selector").href;

  button.addEventListener("click", function(event) {
    window.dataLayer.push({
      event: "link_click",
      href: href
    });
  });
})();
</script>
From the perspective of the non-developer role, it becomes too difficult for them to understand the code and the concept of IIFE.
It is as easy as it looks, but when the website grows and there are more customizations, there are some downsides to doing this way:
- There could be duplicate implementations that are ignored. The insights based on customizations could be skewed or misleading.
- There could be some custom events on a campaign page and other pages with shared CSS selectors. Using a shared GTM with customizations could accidentally collect redundant data and incur potential costs.
- The used selectors or even the entire element could be changed later by developers and it’s more likely leading to data loss. In the codebase, usually, developers will implement tests to avoid breaking data tracking, but they’ll never know there is customization depending on their code.
- Code management on GTM could be expensive
- Too much code on GTM may exceed the maximum workspace size.
Built-in triggers and variables
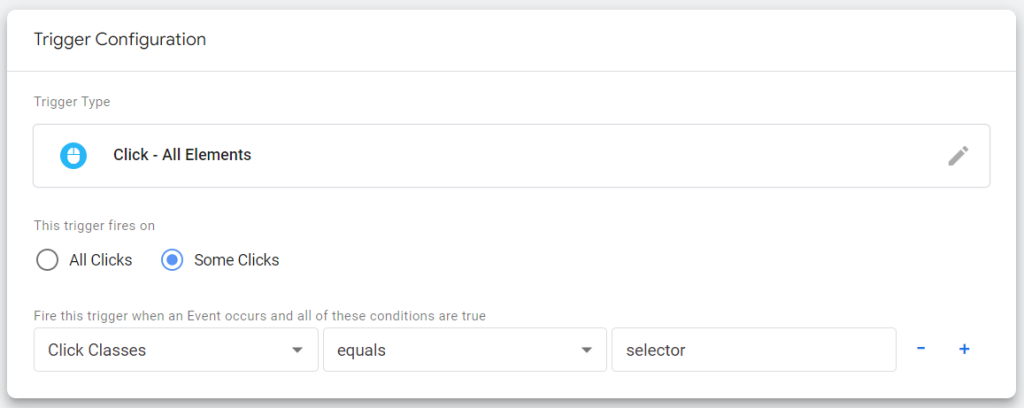
In GTM, there are built-in triggers and variables to be reused. It allows some extent of customization but is space-efficient. For example, we can add an all-element trigger for the usual element click.
If it’s a link click:
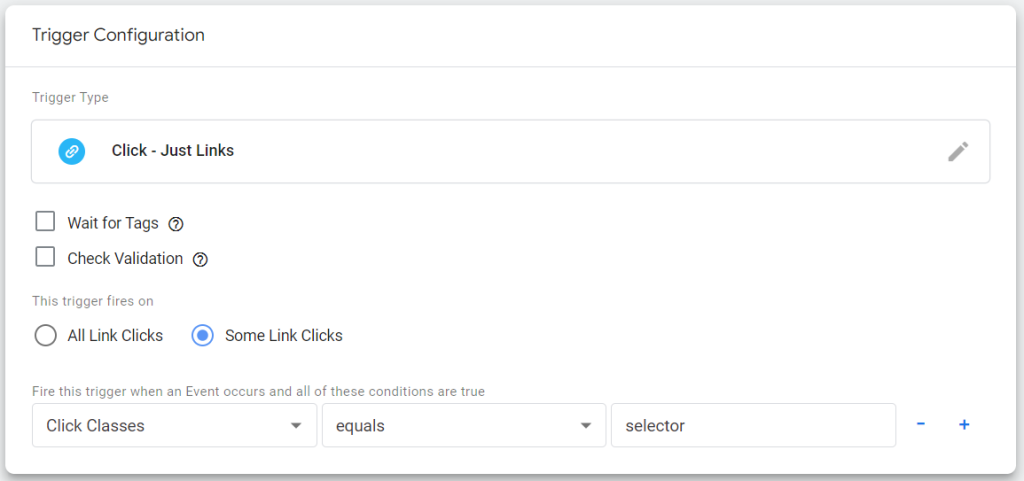
With this approach, we’ll utilize {{ Click Classes}}, {{ Click ID }}, and {{ Click Element }} most of the time.
This approach solves the space limit issue, but other downsides in customization remain. Using one condition such as a selector may accidentally collect other buttons and link clicks. Multiple conditions are easy to break if websites are evolving rapidly.
Conclusion
Google Tag Manager is a solution intended to separate concerns with basic variables, triggers, and tag combinations. It enables the data collection with a script installed on the website, but it’s not suitable to accommodate lots of customizations as there are downsides to this approach. On the other hand, there could be some compromises when in business projects. It depends on the overall cost-effectiveness to decide what’s appropriate.