How to Configure Facebook Conversion API with GTM
1. What is Facebook Conversions API and why do you need it?
1.1. Traditional tracking (client-side)
Conversion data is collected via cookies that are placed on the user’s browser.
Advantages:
- Generally easier to implement, as it often involves placing a script (e.g., Facebook Pixel) on the website or app.
- Provide real-time data, offering immediate insights into user behavior.
- Effective for tracking user interactions within the browser, such as clicks, page views, and form submissions.
Drawbacks:
- more susceptible to ad blockers, which can significantly impact the accuracy of data collection.
- can face challenges due to increased privacy measures, such as browser restrictions, ad blockers, and privacy settings, impacting the reliability of data collection.
- relies on code execution within the user’s browser, there can be potential security risks associated with it.
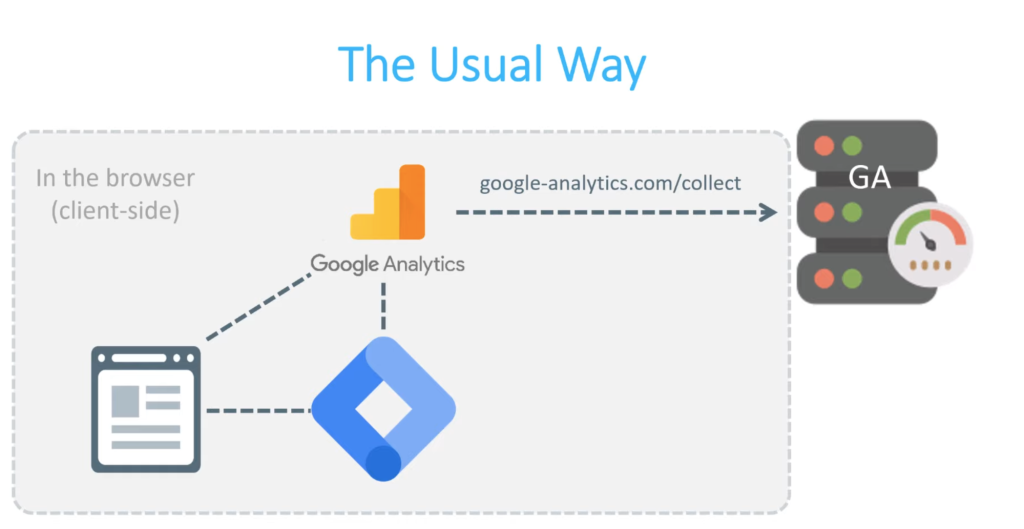
1.2. Facebook CAPI (server-side)
CAPI bypasses these limitations by sending conversion data directly from your website’s server to Facebook.
Advantages:
- Server-to-server communication tends to be more reliable than browser-based tracking.
- Control what kind of data is sent to vendors
- Reduce the risk of Personal Identifiable Information (PII) leaks
- Reduce impact of ad blockers
- Reduce impact on the page speed
- Data enrichment, modification
Drawbacks:
- Paid solution(requires cloud servers)
- Implementation complexity: Implementing server-side tracking can be more complex and may require development resources.
- Real-time limitations: server-side tracking may not provide real-time data, as there can be a delay between the event occurrence and its transmission to the server.
- More difficult to debug

2. Pre-requisites and Important Concepts
2.1. Pre-requisites
- A GTM Server container setup created
- A GTM Web (client-side) container created
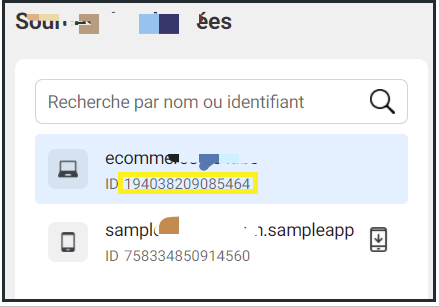
- Get Facebook Pixel ID:
- Go to Facebook Event Manager interface
- On the left, copy your Pixel ID (ex: 119769889999271)
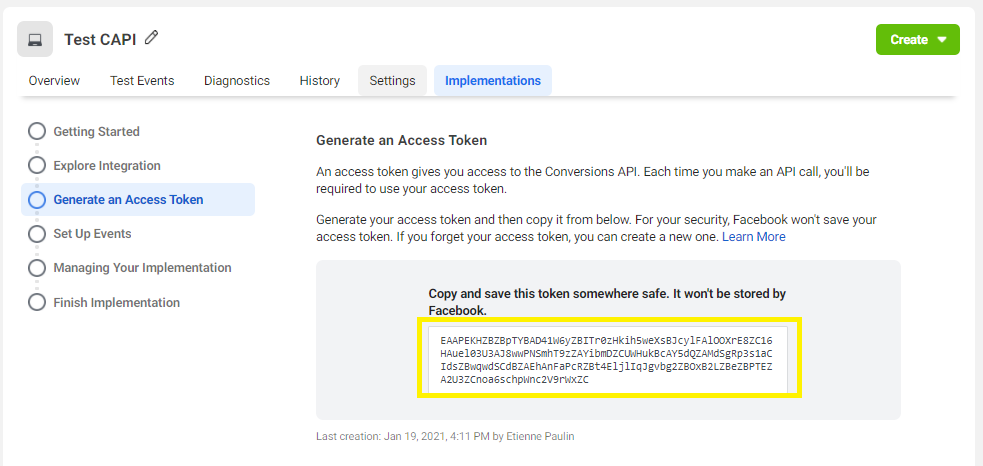
- Get API Access Token:
- Go to Facebook Event Manager interface
- On the left, select your Pixel ID
- On the right, click on the Settings tab.
- In API Conversions section, click on “Create a access token” button, In Implementations tab, you can retrieve the access token:
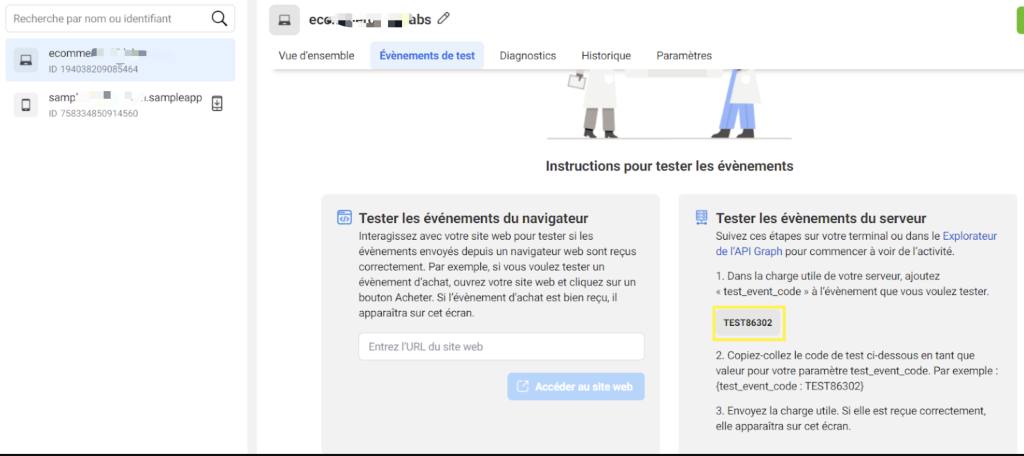
- Get Test Event value:
- Go to Facebook Event Manager interface
- On the left, select your Pixel ID
- On the right, click on the Tests Events tab.
- In Test server events section, copy the value (ex: TEST86302)
This test event code will allow you to validate your deduplication in facebook, once validated make sure you delete the test event code:
2.2. Events Deduplication Method:
event_id is used for deduplicating identical events collected from more than one source. (e.g. When Facebook receives an event from both browser + server, Facebook needs to know that this is the same user sending the same event).
E.g. If there are 2 raw data – event “add_to_cart” from both the client side & server side, the data from the server side will be removed, and keep 1 raw data in Facebook.
Limitation:
- Generally, it only works for deduplicating events sent first from the browser and then through the server. Server events will not be discarded if a browser event has not been received in the past 48 hours, even if an identical browser event arrives after the server event
- Does not deduplicate events when only using one event source, that is browser-only or server-only. If you send two consecutive browser events with the same information, Facebook won’t discard either. Or if you send two server events with the same information, it won’t discard either.
Checkout more in Meta/Facebook docs: Conversion API Deduplicate Pixel and Server Events
client-side: facebook pixel tag setup:
server-side: Facebook CAPI
2.3. fbp & fbc (Sending Meta Browser ID and Meta Click ID)
Along with click id (fbclid) Facebook uses browser ID (fbp). Fbp and fbc cookies help FB determine what kind of user landed on your site and who converted.
If you have set up a custom domain, and your GTM tagging server domain is first-party, the Meta Browser ID and Meta Click ID are sent automatically.
If you’re using the default domain provided, or notice that the Browser ID and Click ID fields are not being sent in Events Manager, you can configure these as follows:

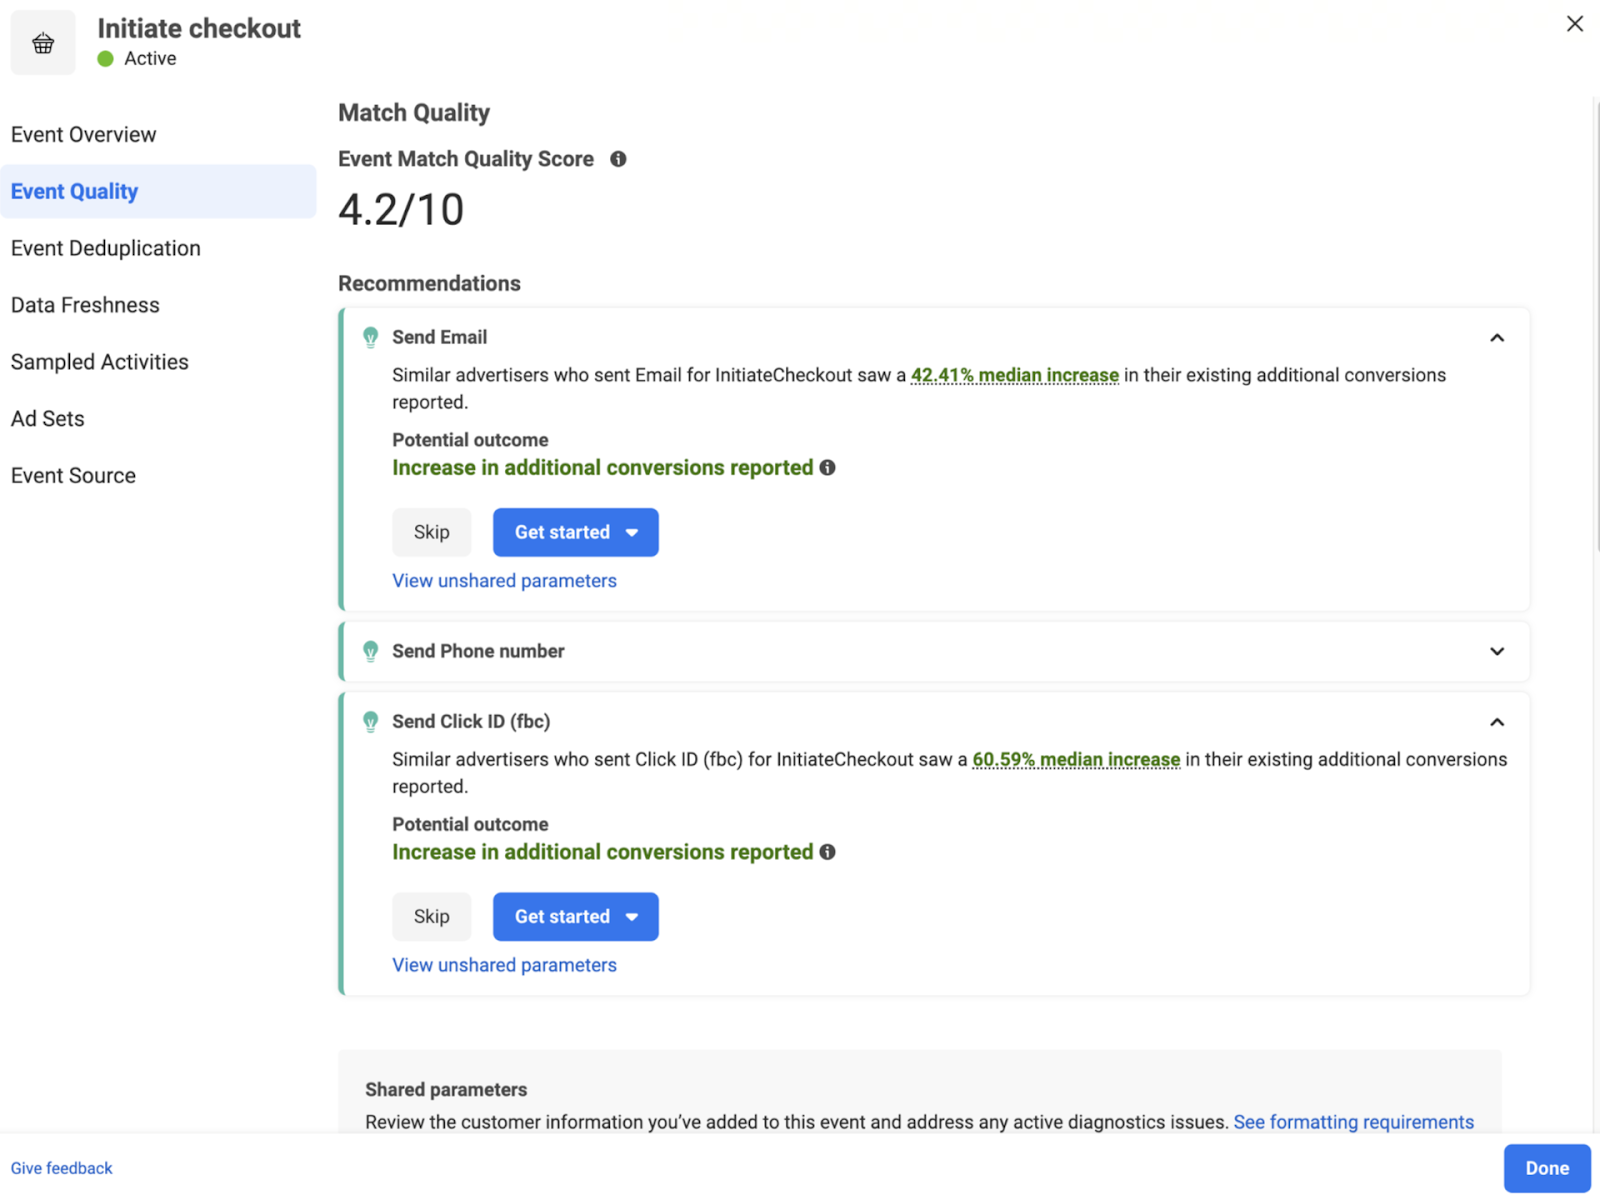
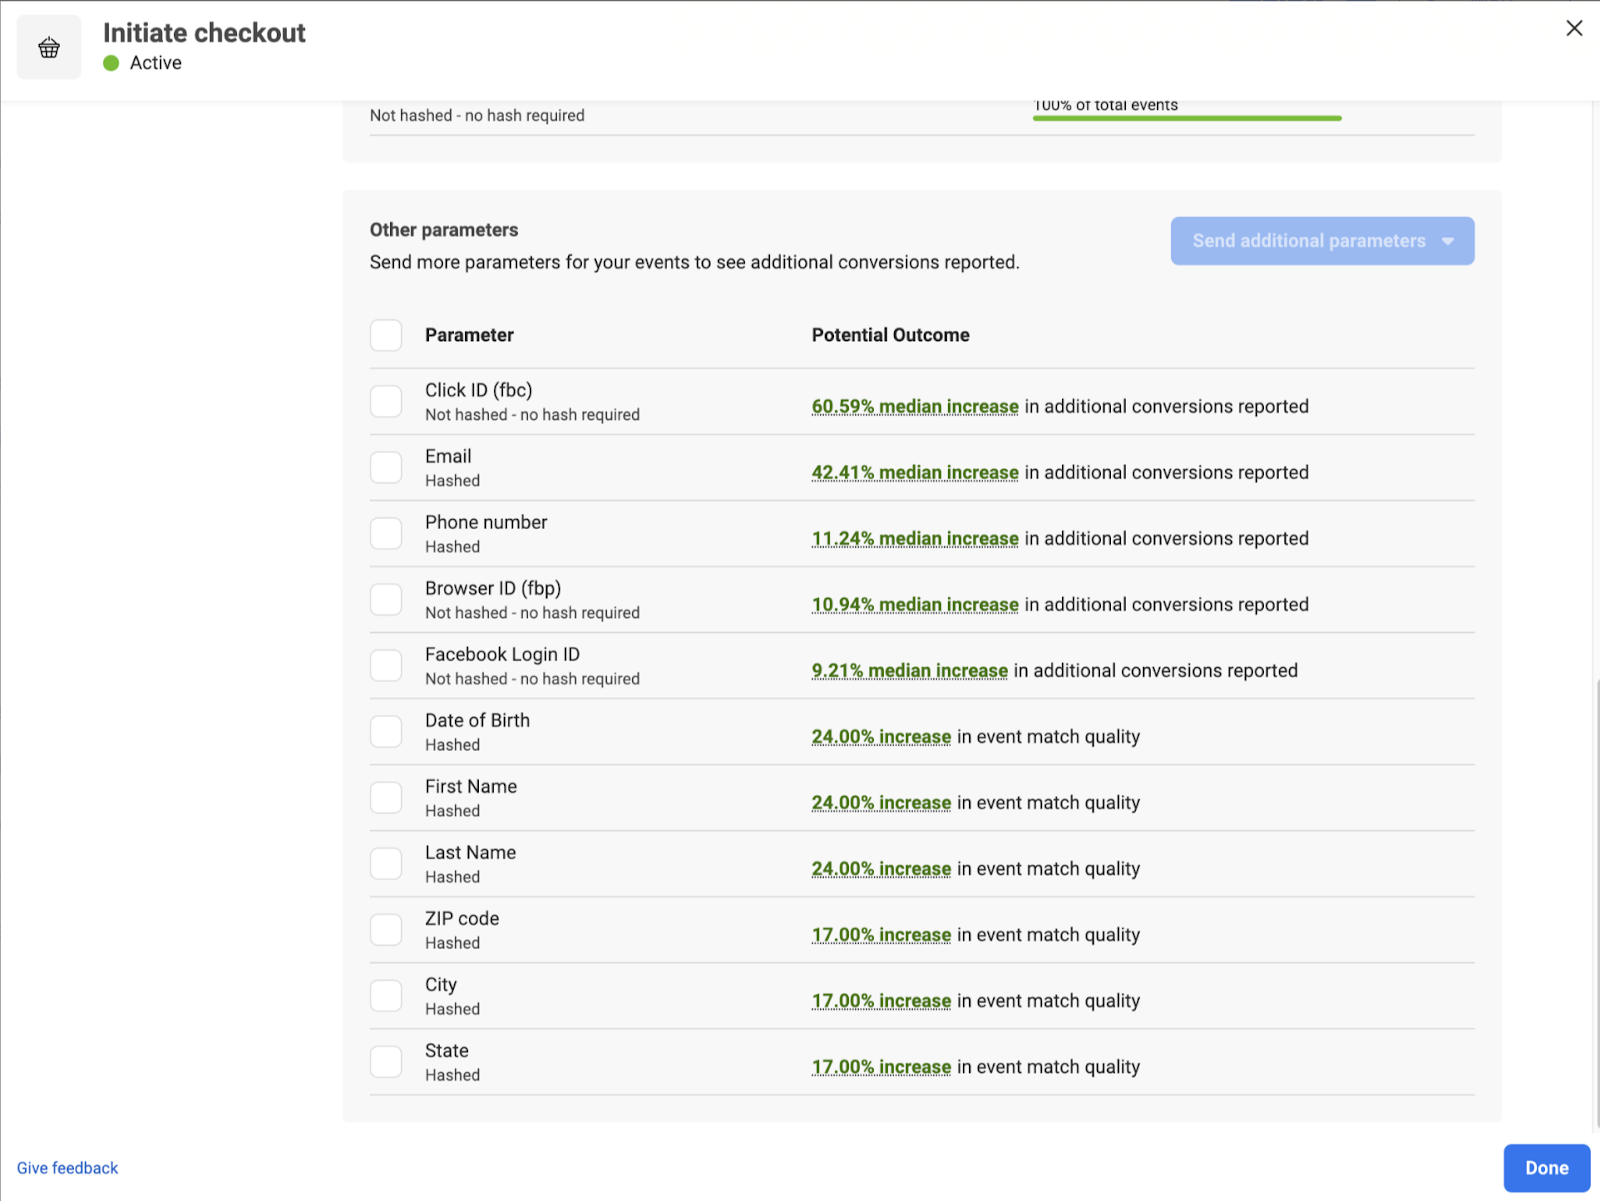
2.4. Facebook Event Match Quality – What it is and how to increase it
Facebook can match users through other parameters such as email, phone number, first/last name, etc. The more user data you send to Facebook Conversion API, the higher the match rate you receive.
The more data you send to Facebook, the more likely Facebook is going to be able to match that event with an actual Facebook profile.
3. Configuration: Setup Facebook Conversional API (CAPI) with GTM
Part 1 – Input: send data to the server-side GTM container ⇒ configure on the web GTM container
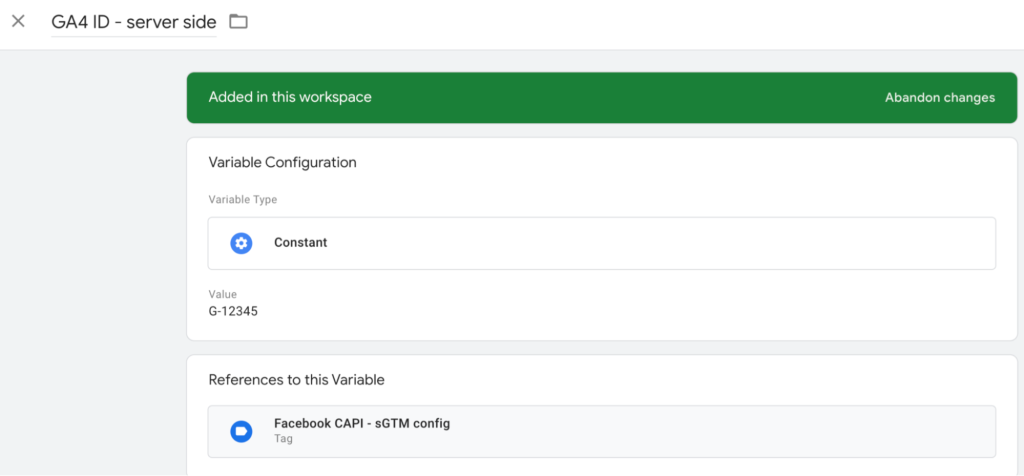
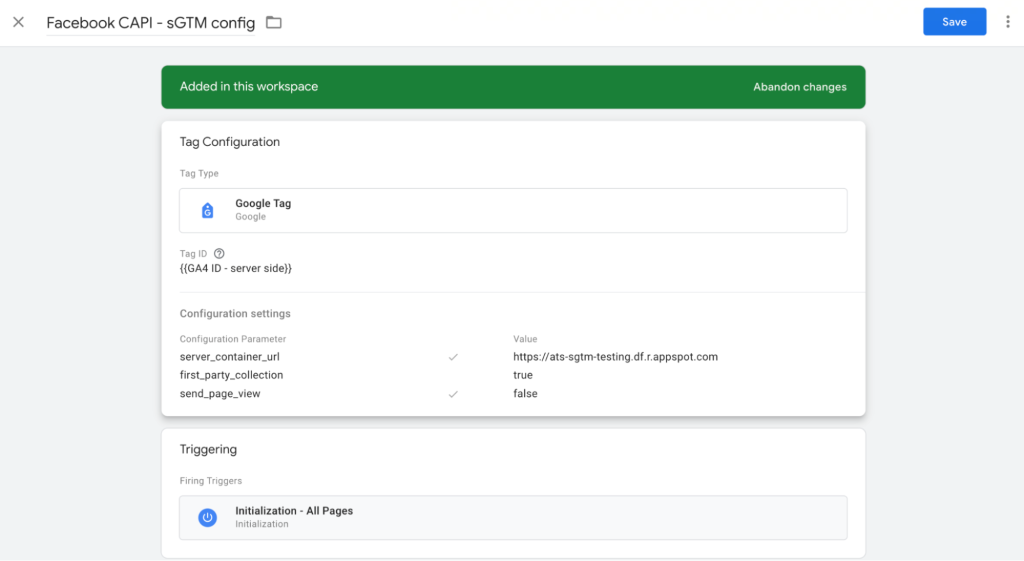
1. sGTM configuration tag – basic info:
| Parameter name | Value | Comment |
| Tag ID | G-12345 | Use a mocking GA4 property ID e.g. G-12345. Do not use the same GA4 ID for sending the data to GA4 (Otherwise there will be duplicated events) |
| Parameter name | Value | Comment |
| server_container_url | https://ats-sgtm-testing.df.r.appspot.com | Set to the server container URL of sGTM |
| Parameter name | Value | Comment |
| first_party_collection | true | The first_party_collection is to be true for enabling Facebook user_data data collection |
| send_page_view | false | set “send_page_view” to be false to disable auto-generated page_view event |
Trigger: Initialization – All Pages
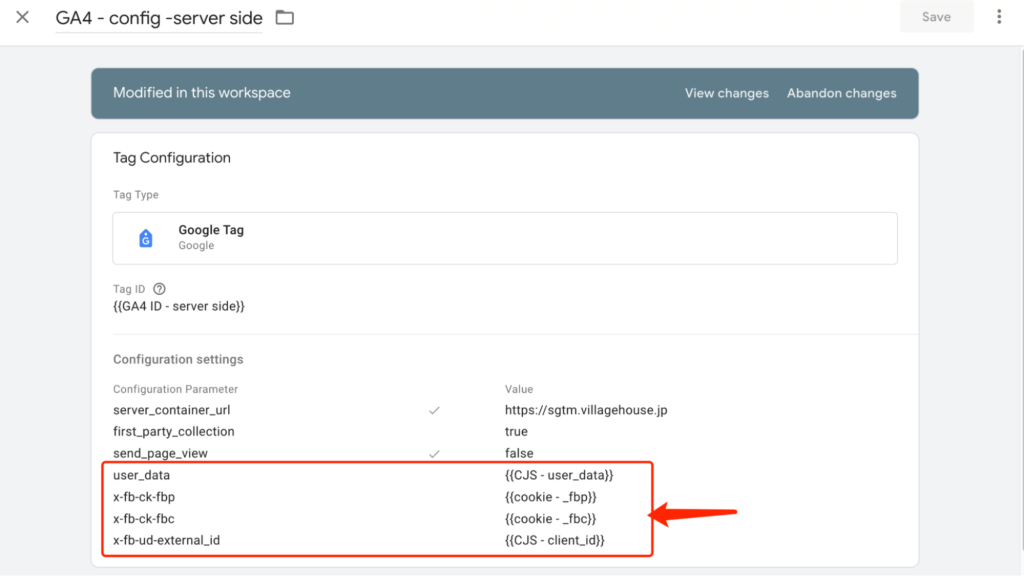
2. sGTM configuration tag – additional info:
| parameter name | value | Comment |
| user_data | function() { return { “email_address”: {{cookie – fbq_enquireMail_em}} || null, “phone_number”: {{cookie – fbq_enquireMail_ph}} || null, “address”: { “first_name”: {{cookie – fbq_enquireMail_fn}} || null, “last_name”: {{cookie – fbq_enquireMail_ln}} || null, “region”: {{DLV – ecommerce.items.0.item_category}} || {{DLV – item_category}} || null, “city”: {{DLV – ecommerce.items.0.item_category2}} || {{DLV – item_category2}} || null, “postal_code”: {{DLV – ecommerce.items.0.item_category3}} || {{DLV – item_category3}}|| null, “country”: “Japan” } } } | Used for user matching (Facebook will use it to match these data to find an actual Facebook profile). Parameters in user_data will be auto hashed. |
| x-fb-ck-fbp | get _fbp cookie’s value as value | |
| x-fb-ck-fbc | get _fbc cookie’s value as value | |
| x-fb-ud-external_id | use client_id in this example case: function get_ga_clientid() { var cookie = {}; document.cookie.split(‘;’).forEach(function(el) { var splitCookie = el.split(‘=’); var key = splitCookie[0].trim(); var value = splitCookie[1]; cookie[key] = value; }); return cookie[“_ga”].substring(6); } | External ID is a string that represents a user on an advertiser’s system, like loyalty membership IDs, user IDs, and external cookie IDs. https://developers.facebook.com/docs/marketing-api/conversions-api/parameters/external-id |
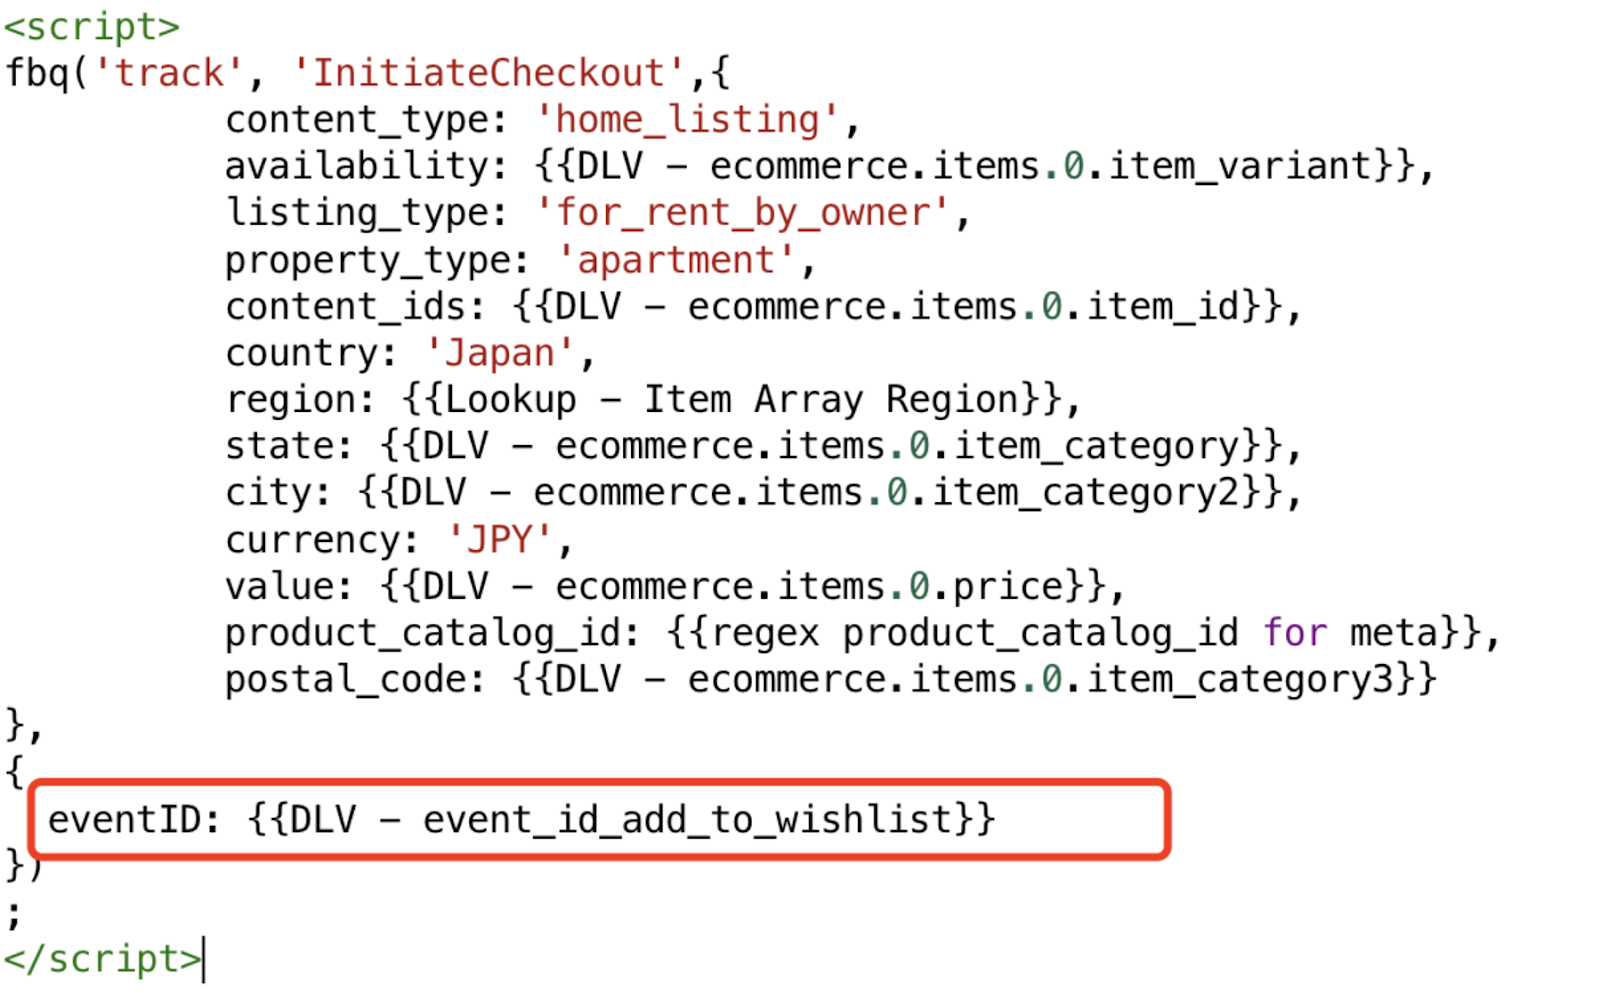
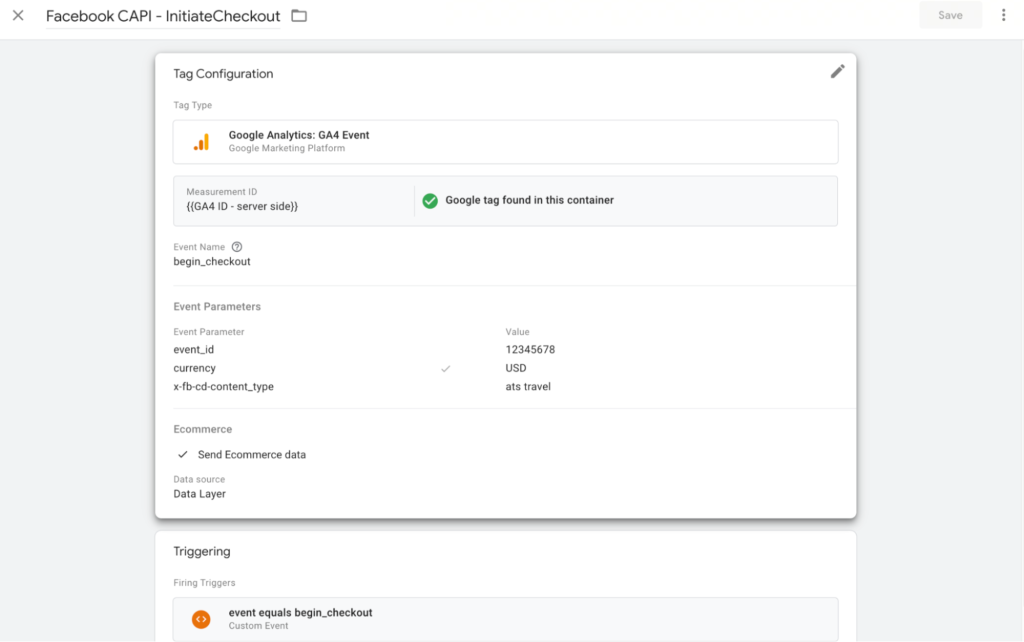
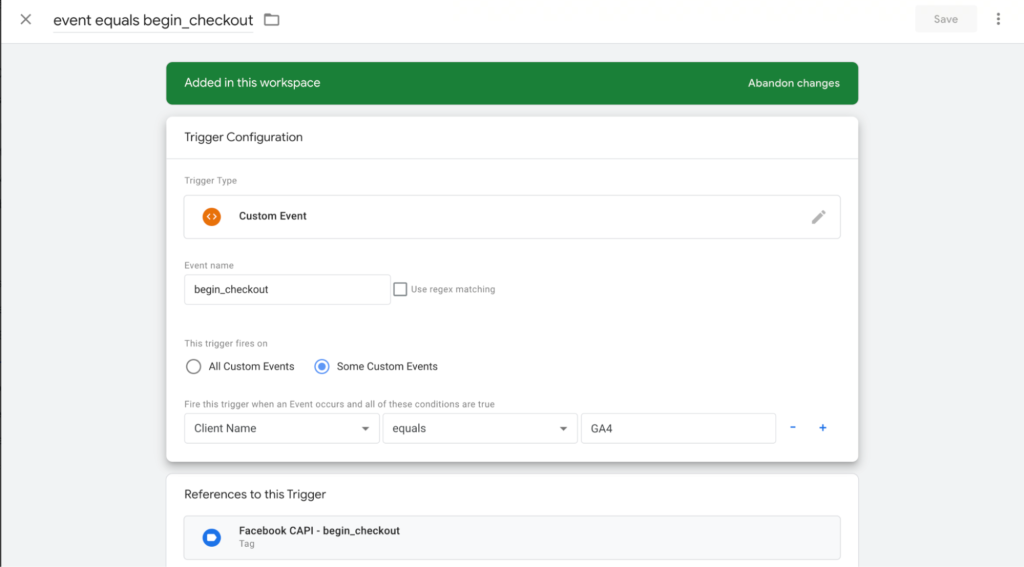
3. Example tag: begin_checkout (Facebook Standard Event Name: InitiateCheckout)
| Parameter name | Description |
| event_name | 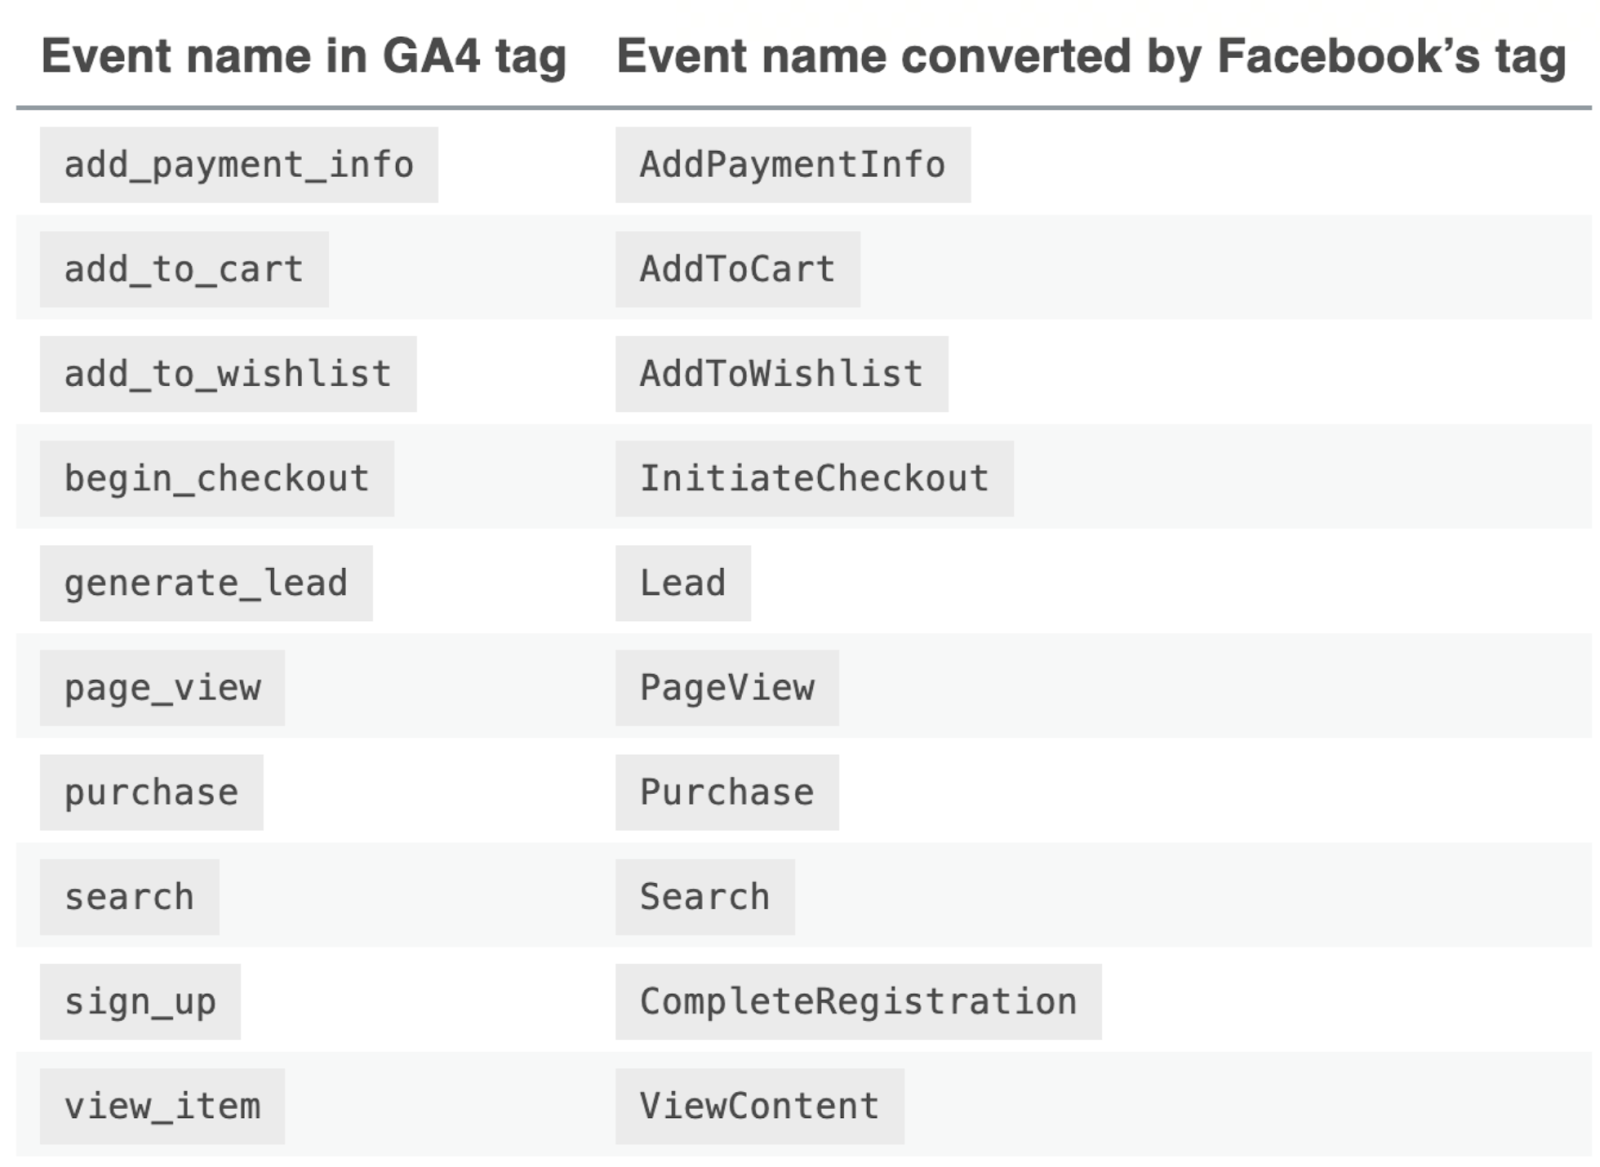 |
| event_id | The event_id must be unique for all the events that should be deduplicated. Each set of events that needs to be deduplicated must have its own unique event ID, otherwise Facebook will not be able to consistently deduplicate the data.(The data from the server side will be removed, and keep 1 raw of data in Facebook.) |
| currency | The currency parameter is required, such as Purchase event. |
| x-fb-cd-content_type | |
| contents | “contents”: [{ “id”: “city001”, “item_price”: 799, “quantity”: 1 }] // sent via “sending ecommerce data”. The server-side Facebook tag can automatically take the contents of this items array and turn it into a contents array. A list of JSON objects that contain the product IDs associated with the event plus information about the products. Available fields: id, quantity, item_price, delivery_category. May have custom contents-scoped parameters. Events are allowed to have custom parameters. If parameters are standard PIXEL events, please follow official documentation to have a valid data format. For example, the contents will be an array of items. |
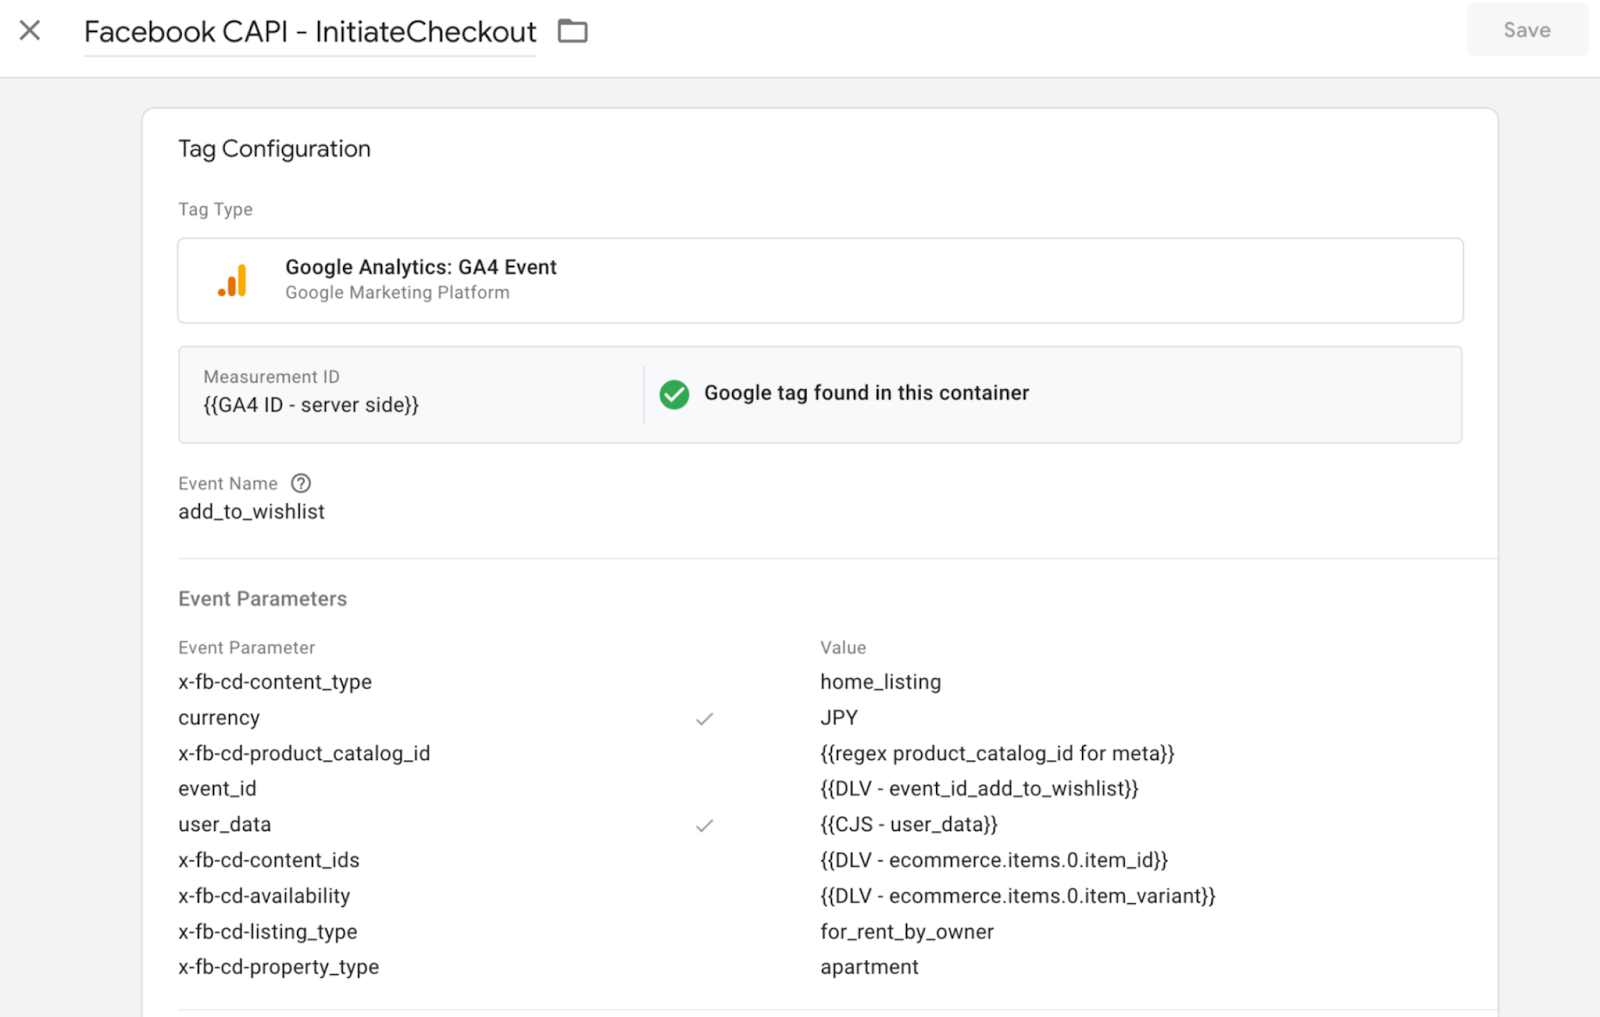
Part 2 – Output: send data to the server => configure on the server GTM container
- In the sGTM, the GA4 client parses the incoming HTTP request sent by the GA4 web tag( converts it into an event data object.)
- The sGTM Facebook tag reads the event data and finally sends the payload to Facebook.
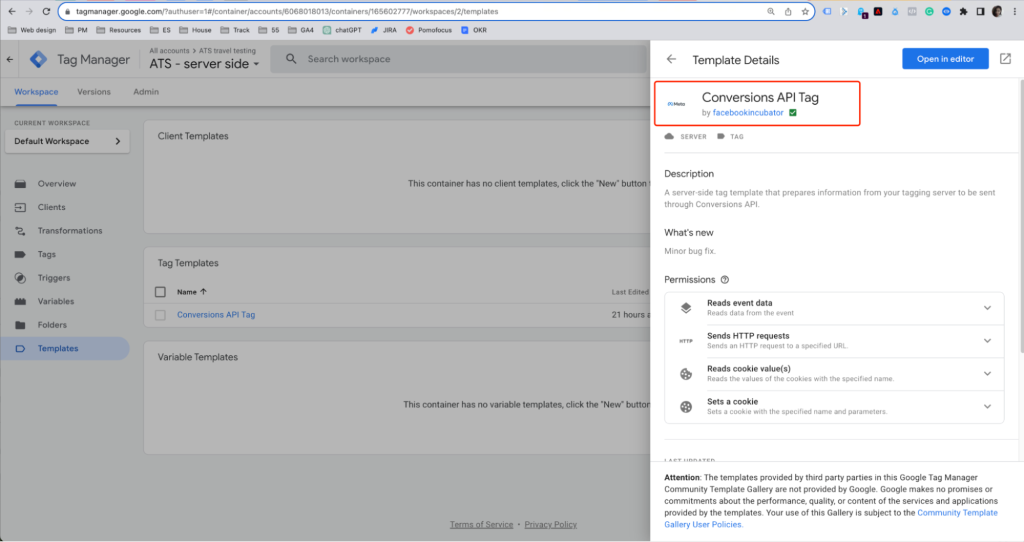
Templates: Add “Conversions API Tag” template created by Facebook official
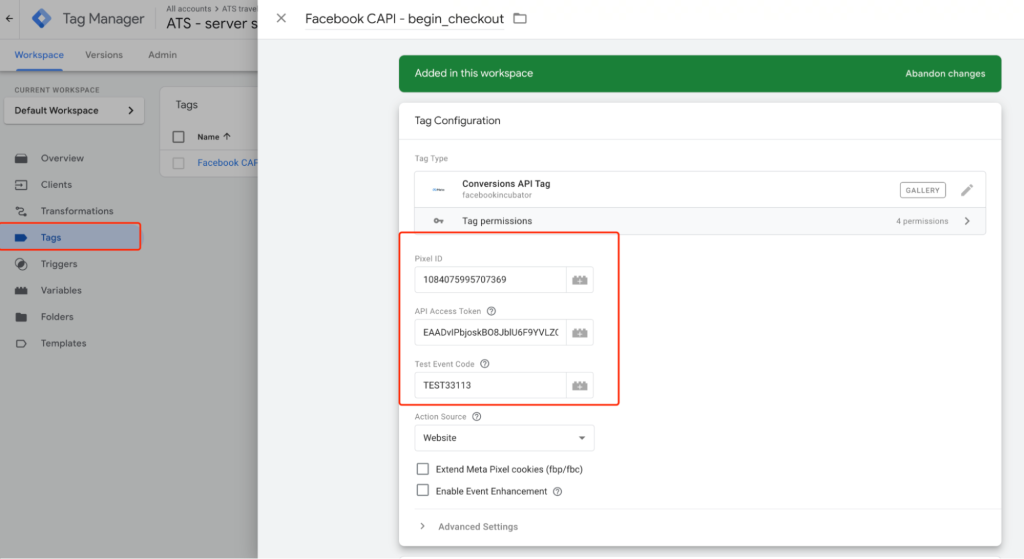
To send data to the Conversions API, you will need the following information:
- The Pixel ID to which the data is sent.
- An API Access Token for interacting with the Conversions API.
- (Optionally) a Test Event Code with which to test the Conversions API without actually causing data to be collected against your pixel.
- You can also set the Action Source explicitly here, if you wish.
4. How to verify Facebook CAPI events
4.1. Check outgoing request details + status
Outgoing request is actually the request sent to the Facebook server. You can check if the request is normal(Successful response – status 200)
Checkout for more request status: HTTP status
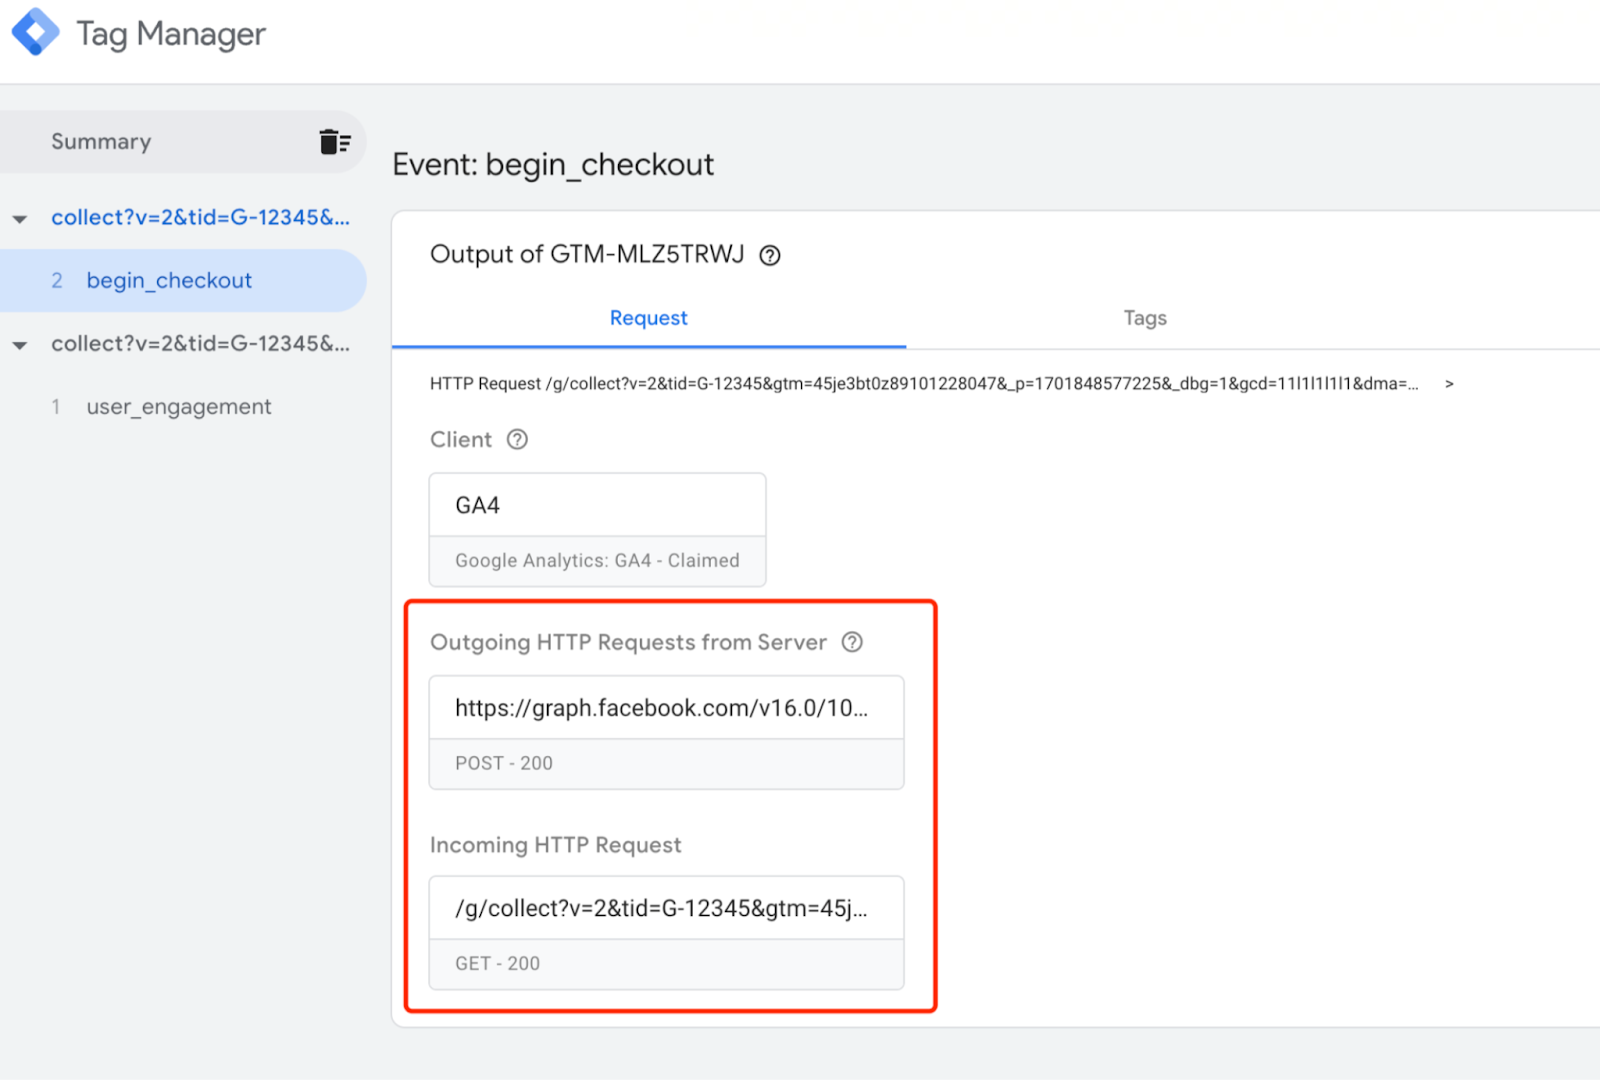
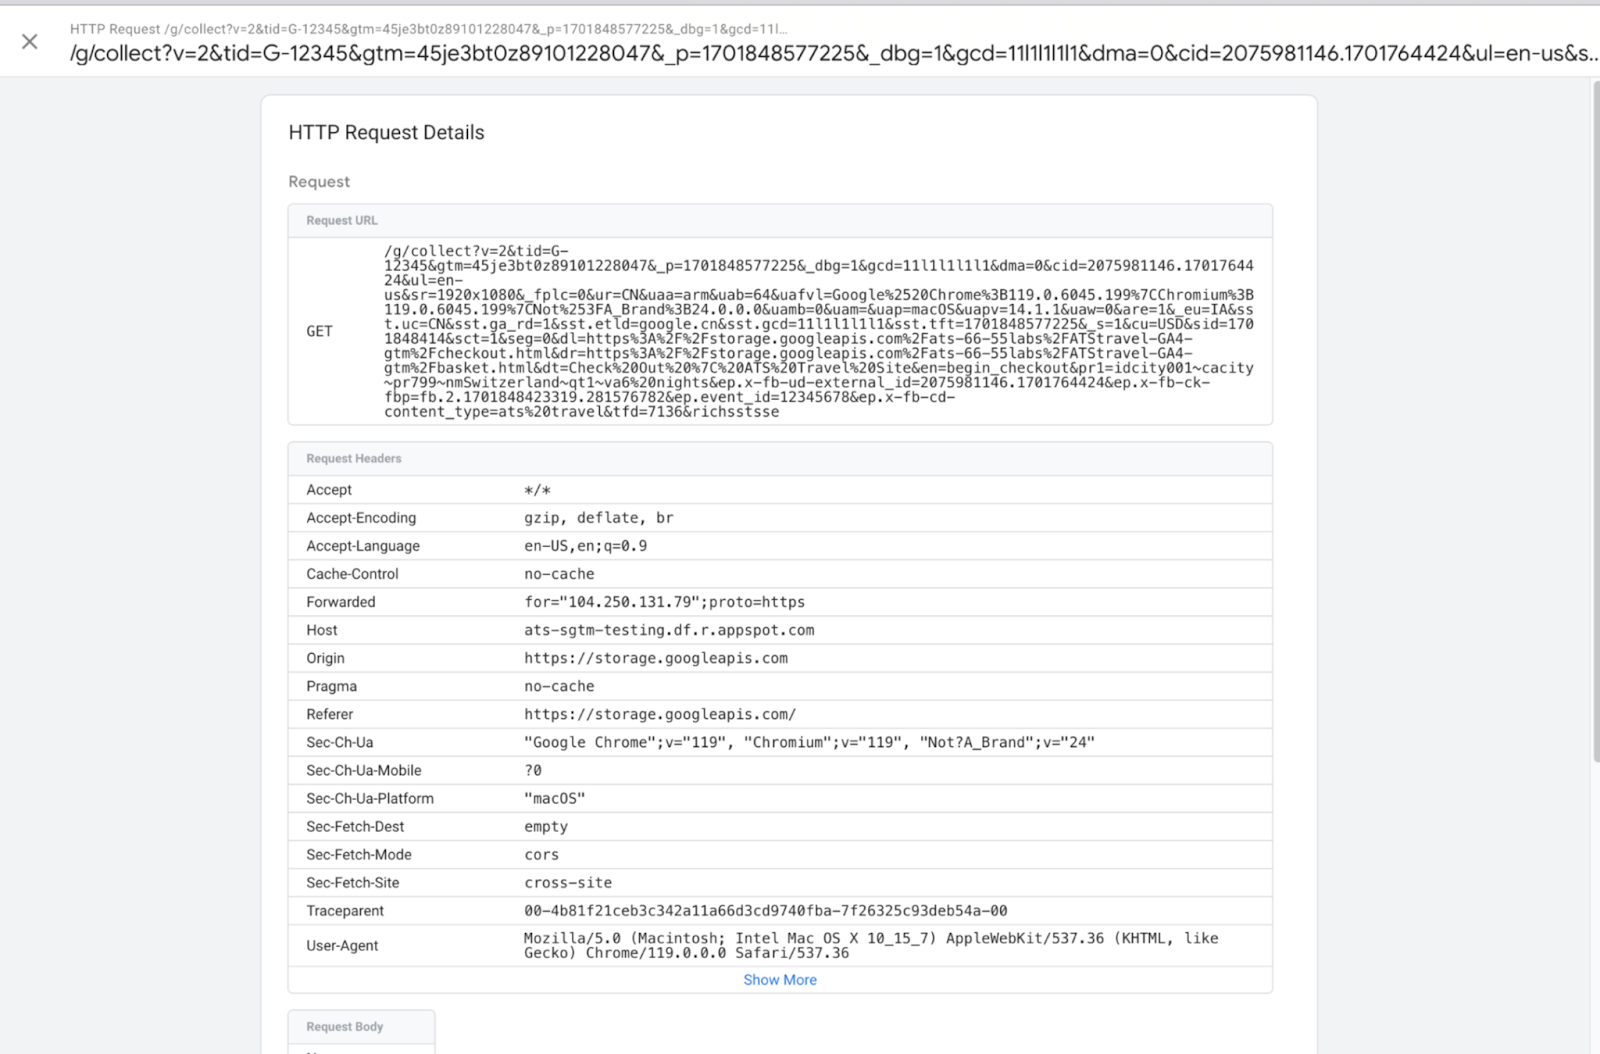
Check the request body to see what data sent to Facebook.(You can use some json formatter to beautify the body content)

Request body – the data we sent to Facebook:
{
        "data": [{
                "event_name": "InitiateCheckout",
                "event_time": 1701848588,
                "event_id": "12345678",
                "event_source_url": "https://storage.googleapis.com/ats-66-55labs/ATStravel-GA4-gtm/checkout.html",
                "action_source": "website",
                "user_data": {
                        "client_ip_address": "104.250.131.79",
                        "client_user_agent": "Mozilla/5.0 (Macintosh; Intel Mac OS X 10_15_7) AppleWebKit/537.36 (KHTML, like Gecko) Chrome/119.0.0.0 Safari/537.36",
                        "external_id": "2075981146.1701764424",
                        "fbp": "fb.2.1701848423319.281576782"
                },

                "custom_data": {
                        "currency": "USD",
                        "content_type": "ats travel",
                        "contents": [{
                                "id": "city001",
                                "item_price": 799,
                                "quantity": 1
                        }]

                }

        }],
        "partner_agent": "gtmss-1.0.0-0.0.9",
        "test_event_code": "TEST33113"
4.2. Check incoming request details:
If something is wrong in the outgoing request, you can check the details of the incoming request to see what has been sent to the GTM server.
4.3. Check test event data in Facebook Event Manager

Event data will be shown in the test events:
